FIX: Apple’s Security Update 2007-001 for AirPort breaks internet connectivity

After installing Apple’s Security Update 2007-001 for AirPort, the AirPort icon on my toolbar stopped working correctly. This is the workaround I’m using until that gets fixed.

Immediately after installing Apple’s Security Update 2007-001 for AirPort, I no longer had wireless connectivity to the internet. This is how I got around the problem.

Here’s how it’s supposed to work: You go to Apple / Software Updates…, it presents a Security Update, to which you select it to download and install. If it affects core pieces of the running operating system, then it may require a reboot. If that’s the case, then you are asked to authenticate the new module when it starts. For instance, a new AirPort driver asks you if you want to let it use your keychain (so you can connect to networks) – this extra line of defense would, for instance, let you know if some malicious program is trying to steal your passwords. Since it came from Apple via an update you explicitly requested, you authenticate, and all is good — everything is back to normal, and you’re more secured.

This didn’t happen when I installed the Apple Security Update 2007-001 for AirPort.

Immediately after the system reboot, I noticed that I wasn’t prompted for my password for the new replacement driver. This doesn’t always happen with minor changes, but you can almost always expect it with a security update.

Additionally, my AirPort icon in the tool bar was gray, suggesting that the AirPort power was off. So, I selected Turn Airport On, which normally starts scarfing the air for networks, joining my default one or letting me choose from a list. However, in this case, nothing happened.

I confirmed I wasn’t connected via the browser. And repeated attempts to turn on the network were futile.

At this point I opened the Network Diagnostics utility using QuickSilver.

If you don’t have that, you can go to your main disk, and go inside the System folder, then the Library folder, then the CoreServices folder, and click the Network Diagnostics application. Or, you can open a Terminal window and enter:

  $ open /System/Library/CoreServices/Network\ Diagnostics.app

Surprisingly, this told me my computer’s internet was working normally, and did I want to continue. I picked Yes. It then wanted to know which network port I wanted, I chose AirPort. My network appeared in the list, and I selected it and clicked Continue. It said I was now connected, and I hit Quit.

Sure enough, Apple / System Preferences / Network showed a green light next to my AirPort, and the text said I was now connected. A quick browser check to the internet confirmed that was, indeed, the case.

Meanwhile, the AirPort icon on the toolbar remains grayed out, convinced I’m not connected, and that there’s nothing that can be done about it.

Obviously the network card is working, as are the new security patches. It looks like something relatively minor got overlooked with the interface. But it’s nice to know there’s a workaround at the moment.

UPDATE 16-Feb-2007: I HAVE A FIX.
Grab a copy of OnyX, go to it’s Automation page, and fill out the form like this:
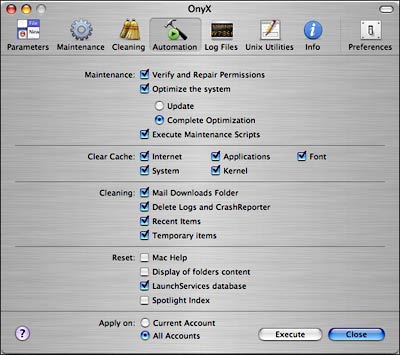
OnyX Automation Screen

Then press Execute, this will take a while and require a reboot at the end.

Next, grab a copy of AirPortExtremeUpdate2007001.dmg and re-install it, this will require a reboot as well. At this point your Wi-Fi AirPort problem should be fixed.

And while you’re at it, grab a copy of SecUpd2007-002Univ.dmg and install that too, then reboot.

I believe what’s going on, and this is pure speculation, is that there’s some kernel cache files that either prevent the 2007-001 update from being installed or simply override the changes is has. By using OnyX, it’s possible to clear out all the cruft that’s plaguing the operating system, allowing the patches to work as advertised.

And, once you do the above, be sure to go to Apple / Software Update… — if you weren’t getting any updates since installing 2007-001, you’ll notice things like Final Cut Pro, Java for Mac OS X 10.4 Release 5, and Daylight Savings Time Update.

As an aside, here’s a list of Apple Security Updates for OS X.

Restoring Normality to OS X – Right-Click, Expose, Sleep, and Passwords

My MacBook Pro wouldn’t sleep, draining my battery each night. It wouldn’t ask for a password after a screen saver. Here’s why, how I fixed it, and what caused it to happen in the first place.

Ok, let’s start off by stating out right this was my own darn fault…

I’m using a MacBook Pro (Intel) running OS X 10.4.8, and my personal habit is to charge the system way up to full, then use the battery until it’s virtually drained, and repeat. Somehow I’m hoping that this will get me longer battery life, but that’s another story.

OS X is really smart in that while you’re working it pops up a dialog box telling you that you’ve got ten minutes of battery life left, and that you should go get your adapter and plug in the laptop. It’s so smart, in fact, that if you do that, it will close the dialog without you even have to click. Very clever.

But Apple is also treats you with a little respect. If you dismiss the dialog box, it’s not going to remind you any further. You know about the condition of the battery, as you just acknowledged it. To perpetually remind you would not just be insulting, but get in the way of what you were doing. I can’t count the number of times I’ve acknowledged the state, finished an email leisurely, and then gotten my adapter. I like that. I like not being nagged.

With that kind of interface comes responsibility, and I neglected mine. I allowed myself to get distracted by other things and it took me a moment to realize what had happened when the screen went dark and wouldn’t come back with a flick of the touch pad. I had accidentally allowed my battery to completely drain.

Turns out you don’t want to do this. It’s not going to damage your computer, but at the same time it isn’t going to leave things in a very valid state.

First, let’s give some credit to Apple — the moments after I plugged in my power adapter, the disk whirled up, and within a few seconds my screen came back to life, I lost no data, and my internet connections were still functioning. In the laptop’s last dying breath, it had preserved its state to disk, recovering when it had power.

The immediate concern is a disk repair; although the file system is journaled and your data won’t get corrupted, if it was in the middle of doing something where it hadn’t gotten that data to disk yet, that data is lost. This can result in minor file system problems which are easily corrected by booting your original OS X install disc and using the Disk Utility (rather than the install program) to repair the volume structurally, and then repair permissions.

But things doesn’t necessarily stop there. It is possible that your system, because of lack of power, lose some important system settings. The best analogy I can make for PC users is when your CMOS battery dies and your system “forgets” all the settings for the time and drives. While this doesn’t happen on the MacBook Pro, the following things did happen — and here’s how I corrected them.

1. The “Place two fingers on trackpad and click button for secondary click” stopped functioning. Solving this was merely a matter of going to the Keyboard & Mouse preference screen and toggling it off and back on.

2. The function keys, F9 – F12, stopped invoking Expose. Solving this was merely a matter of going to the Dashboard & Expose preference screen and setting the keyboard shortcuts back, they became unassigned.

3. The laptop stopped going into sleep mode when I closed the lid; apparently the power management subsystem had gotten confused. If something like Firefox was running GMail, this was enough to keep the system running (even though the back light went out). I’d awake in the morning to find my battery drained, leading to more problems of this nature. The laptop’s “sleep” led wasn’t “breathing” and pulsating as it does when hibernating. The solution was to reset the power management: Shutdown, Remove Battery, Hold Power Button for 5 Seconds, Insert Battery, and Boot.

4. When the laptop was woken up or coming out of a screen saver, it was not prompting for a password, as I had configured it to do. The solution was to Reboot, Hold Down Option-Command-P-R (that’s four keys at once!), wait for the chime, and release all four keys letting it boot as normal, then, sign on and go to the Security preference screen and toggle “Require password to wake this computer from sleep or screen saver”

I’m happy to report, the Mac is back working perfectly.

Oh, and a tip for people who want to put their Mac to sleep real quick, even with the above problems you can do this, press Option-Command-Eject. You’ll have to close your lid and re-open it to wake.

OS X: Batch Rename from GUI

This is the third time I’ve had to go hunting how to enable batch filename manipulations for OS X. Now I’m documenting it so I don’t have to hunt this down again.

I keep forgetting about this trick, so I thought I’d post it in the event I have to ever do it again.

Part of the problem with a graphical GUI is that it’s very difficult to rename files in batches, for instance, prepending some text to a group of files.  This kind of thing is fairly trivial at the command line.

Apple has a facility to do this, but as it’s not something a regular user does often, it’s not enabled by default.  Here’s how to get all kinds of additional functionality out of OS X.

1) Open /Applications/AppleScript

2) Turn on Show Script Menu in menu bar

3) Optional: turn on GUI scripting, show library scripts, and choose where to show them.

You’ll notice up near the time in the menu bar a black scroll has appeared.

All the batch renaming and filename twiddling stuff is under the Finder Scripts.

UPDATE 19-Dec-2009: Upgrading to Snow Leopards deletes some useful scripts, specifically the Finder Scripts.

UPDATE 31-Aug-2010: The scripts live in “/Library/Scripts/Finger Scripts” and are

  • Add to File Names.scpt
    md5 4b0cd899acb19b5fc62ef2049d81a933 – 18114 bytes
  • Change Case of Item Names.scpt
    md5 af7429228be4d0e1a096092af5341c52 – 17808 bytes
  • Replace Text in Item Names.scpt
    md5 716493cab1c569953a7f40d76ed9a1f7 – 24328 bytes