Hidden Preference File

Check your ~/Libarary/Preferences directory, do you have this hidden file?

I’m not keen on applications that leave cruft or secret files on my system when there’s no need to do so.

I ran into a file on my laptop called ~/Library/Preferences/.bridge01.dat as well as .bridge3_01.dat — why a preference file is hidden, I don’t know.

Suspecting the file might be part of Adobe Bridge (it wasn’t), I copied it to the desktop, and looked at the file with less from the command console. It was clearly a binary preference file.

I renamed the file to bridge01.plist and started to open it with Xcode, although seeing BBEdit could open it, thought I’d give that a shot and was nightly impressed it detected the file type and presented it as a regular XML file.

Inside was slightly cryptic, but I recognized a sequence of text starting with ESC- and it looked like a serial number. Using Spotlight I was able to find another file that had a matching string, my purchase notes for Flux 3, by The Escapers.

Again, I’m not thrilled about hidden .dat files that ought to be public .plist files in my user’s preferences directory. But at least it was a mystery solved.

OS X: Incomplete and partial files

Grey folders inaccessible from Finder? OSStatus error -43? Incomplete or partial folders? Here’s what I think is causing them and quite possibly what you can do about them.

I recently bought a Drobo FS with a lot of storage to keep a lot of my photography and other files backed up, redundant, and available.

Even with a “small” source drive, pumping the data to the Drobo at high speed can take a while. This isn’t the fault of the Drobo, nor the network, it’s that there’s just a lot of stuff to push through the pipe.

About 25 Hours to Go

But I ran into an odd problem, and I haven’t been able to get a good answer as to what’s happening. This is a call to geeks.

The problem is when a copy operation fails.

This could be because one rebooted the Drobo during a long copy operation, one rebooted the machine during a long copy operation, or, more likely, OS X Finder just aborted for no good reason and rather than allowing one to try the operation again, resume, or skip the problem area, the whole batch stops.

TIP: It can sometimes be better to have multiple (concurrent but blocked) copy requests that were individually initiated, than one mega-copy operation. Finder seems to like smaller sized chunks, plus if something goes wrong, there’s less to deal with.

What you end up with is a situation that’s hard to describe without seeing it. It’s a destination directory that look like this:

Incomplete Files and Folders
  1. The folders appear as grey.
  2. The folders can not be selected or opened from Finder.
  3. The folders do not have the little triangle icon by them.
  4. The folders can not be renamed from Finder, but can from Terminal.
  5. The folders can be copied, but they copy as grey.
  6. The contents of the folders can be seen using Terminal.
  7. If you use Finder to copy over them, it sees the name in use and makes a similarly named folder with a number after it.
  8. The source files are not in use.

The question is, then, how to ungrey the folders and finish the copy?

So far, I haven’t found a way.

At the moment, I’m speculating if this is related to kFirstMagicBusyFiletype, kLastMagicBusyFiletype, or kMagicBusyCreationDate as shown in the Finder.h header.

Remember, if I have to delete the directory (which can take a while — if it can be done), and then re-copy everything again (which will take a long while), and still not be certain that copy will complete, it’s a huge investment that may not pay off.

Geeks, I know what you’re thinking — I thought it too:

Was the source drive clean?
Yes. I do a Disk Utility check on my source volumes before copying from them.
Was the destination drive clean?
Yes. I do a Disk Utility check on my destination volumes before copying to them. In the case of the Drobo, I had just formatted it, using the latest firmware, and its dashboard gave the all clear. I even peeked with their sshd application.
Did you check the file permissions?
They’re clean with the regular 700 permissions. Finder’s Info concurs.
# ls -ableO@dFGinpqT *
863913 drwx------ 3 501 501 - 264 Feb 13 19:09:02 2011 NormalDirectory/
863912 drwx------ 3 501 501 - 264 Feb 13 19:09:13 2011 WhyIsThisGrey/
What happens if you delete them with # rf -vrf badDir?
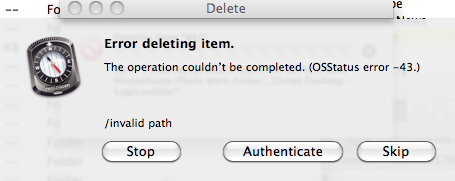
Sometimes that works, actually. Other times the delete command just hangs indefinitely, like the file is busy.That said, using the Path Finder shell, this is what you get if you attempt to delete a directory that’s acting up.

OSStatus Error -43

Any idea what an OSStatus error -43 is? Or why they’d be an invalid path inside the destination directory?

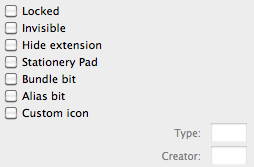
What about extended attributes? Type? Creator?
They’re clean, too. Verfied by Path Finder, stat, xattr, and /usr/bin/GetFileInfo.
# stat -x *
File: "NormalDirectory"
Size: 264 FileType: Directory
Mode: (0700/drwx------) Uid: ( 501/ wls) Gid: ( 501/ wls)
Device: 45,12 Inode: 863913 Links: 3
Access: Sun Feb 13 19:09:02 2011
Modify: Sun Feb 13 19:09:02 2011
Change: Sun Feb 13 19:09:02 2011
File: "WhyIsThisGrey"
Size: 264 FileType: Directory
Mode: (0700/drwx------) Uid: ( 501/ wls) Gid: ( 501/ wls)
Device: 45,12 Inode: 863912 Links: 3
Access: Sun Feb 13 19:09:13 2011
Modify: Sun Feb 13 19:09:13 2011
Change: Sun Feb 13 19:09:13 2011
# xattr -l -v -x NormalDirectory WhyIsThisGrey
(nothing returned)
# /usr/bin/GetFileInfo -a -tcdm *
# /usr/bin/GetFileInfo -a NormalDirectory
avbstclinmedz
# /usr/bin/GetFileInfo -a WhyIsThisGrey
avbstclinmedz

No Extended Attributes, according to Path Finder
What happens if you rsync?
Doing an rsync appears to work, but doing it to the “broken directory” does not fix it after it completes.
# rsync --progress -aPE source destination

Further Thoughts

I found an article that suggests there’s a lot more going on with the file system than most of us give credit for. It talks a lot about the importance of meta data.

More Metadata That I First Thought

Two blog posts, The State of Backup and Cloning Tools under Mac OS X and Extended Attributes led me to playing with the xattr and mdls commands.

xattr didn’t have much interesting.

$ xattr -l SomeGreyDir
com.apple.FinderInfo:
00000000 00 00 00 00 00 00 00 00 00 00 00 00 00 00 01 00 |................|
00000010 00 00 00 00 00 00 00 00 00 00 00 00 00 00 00 00 |................|
00000020

The mdls command presented a better clue. Check out the kMDItemFSCreationDate attribute.

$ mdls SomeGreyDir
kMDItemFSContentChangeDate = 2011-02-20 14:02:19 -0500
kMDItemFSCreationDate = 1946-02-14 03:34:56 -0500
kMDItemFSCreatorCode = ""
kMDItemFSFinderFlags = 0
kMDItemFSHasCustomIcon = 0
kMDItemFSInvisible = 0
kMDItemFSIsExtensionHidden = 0
kMDItemFSIsStationery = 0
kMDItemFSLabel = 0
kMDItemFSName = "SomeGreyDir"
kMDItemFSNodeCount = 0
kMDItemFSOwnerGroupID = 501
kMDItemFSOwnerUserID = 501
kMDItemFSSize = 0
kMDItemFSTypeCode = ""

A quick romp through my incomplete folders revealed they all had a magical creation date of 1946-02-14 03:34:56 -0500.

The solution I think I need

I’m looking for a way to locate files with the kMDItemFSCreationDate
attribute set to that magic value, and then change it to whatever is in the
kMDItemFSContentChangeDate.

My suspicion is that this will let Finder, and the Apple command line utilities,
consider the file isn’t busy anymore.

WordPress FTPS is not SFTP

Is WordPress giving you server errors when you try to update or upload themes? Are your only two options FTP and FTPS (which is not SFTP)? Here’s how to fix that, make WordPress work with SSH, giving you an SSH2 option for updating. And it works.

A major shout of thanks goes to Jon for his WordPress post entitled Enabling SSH/SFTP Updates.

I’d been struggling with making WordPress updates work properly for the longest time, setting up file ownerships and permissions. Things always seemed to be mostly right. If I tried to do an update of any form, I’d see this:

Error: There was an error connecting to the server

WordPress offers FTP and FTPS (SSL).

I’d try the secure option and things just would not work. Then I’d go examine my SFTP connections and my SSH, and it’d all be working fine.

It took bdawson‘s post on FTPS vs. SFTP to make me realize I was so falling into the habit of typing STFP that I didn’t realize that wasn’t what WordPress was offering!

With Jon’s post, enabling SFTP in WordPress becomes trivial.

  1. # apt-get install libssh2-php
  2. # /etc/init.d/apache2 restart

The SSH2 option then presents itself, and all is right in the world. Thanks guys!

NTFS on OS X

Trying to write to an NTFS volume on OS X, and all you find are third party packages and complicated config file manipulations asking you to reboot? Do this….

Every once in a while someone brings over an external NTFS formatted drive and plugs it into my Mac to exchange some large data sets. While the Mac can easily read NTFS, it doesn’t appear to have the capability to write to that file system.

Appears is the operative phrase.

If you search for a solution in the open, you’ll find companies selling commercial products, drivers, and mounters. Some people have posted complicated looking instructions telling instructing you to mess with low level system files, that may or may not exist, ending in a full system reboot that typically solves the problem for that lone drive.

NTFS on OSXHere’s the generic no-software required solution.

First connect your NTFS drive to the Mac, it’ll mount with some name like “My Disk.”

Open a Terminal window and enter the command:
$ mount

The mount command will tell you what drives are listed. Find the one that has your drive name listed in it and copy the device name:
/dev/disk1s2 on /Volumes/My Disk (hfs, local, nodev, nosuid, journaled, noowners, mounted by me)

Now eject the drive, but don’t disconnect it from the machine.

Go manually create the directory (shown in bold above); this is where the mount point will be:
$ cd /Volumes
$ mkdir My\ Disk

NOTE: The backslash escapes the next character, in this case allowing a space in the directory name.

Now, mount the drive as read-write using this command:
$ sudo mount -o rw -t ntfs /dev/disk2s1 /Volumes/My\ Disk

Make sure that you’ve used the same device location you copied down the the prior steps.

At this point your drive should appear on the desktop, and you ought to be able to read and write to it just fine. No rebooting necessary!

Note that you can get to it from the Terminal as well:
$ cd /Volumes/My\ Disk
$ ls

Note that sometimes Finder may act a little wonky with timing problems and a huge file. Apparently the underlying Unix system has no problem. You can copy a big file to the drive:
$ rsync –progress SuperBigFile.zip /Volumes/My\ Disk

Or a whole directory:
$ rsync -r –progress LargeDeepDirectory /Volumes/My\ Disk

When done, make sure you are not running any programs that are accessing the drive or have their current directory set to the drive:
$ cd /Volumes

Then, eject the drive normally, or unmount it from the command line — your choice.
$ sudo umount /Volumes/My\ Disk

Full disclosure and warnings: This was tested on OS X 10.6.5, though support has been around to do this for a while. And, any time you’re doing something that deals with questionable file system access, make sure there’s nothing on the drive you don’t mind losing. Have a backup. There’s always a slight risk, but it’s very close to zero — why state all this? Because I assume no responsibility if something goes wrong.

Error 0x80070057 (SOLVED)

Copy File

An unexpected error is keeping you from copying the file. If you continue to receive this error, you can use the error code to search for help with this problem.

Error 0x80070057: The parameter is incorrect.

SOLVED!

Went to copy a directory on Windows 7 from one drive to another, something that I had done quite frequently, even earlier that day.

However, this time, and nothing had changed substantially with the source files, I got an Error 0x80070057 message stating “The parameter is incorrect.” At that point the copy dialog from my simple drag and drop would allow me to retry (useless) or abort mid-copy.

The error message was unusually cryptic and less that helpful:

Copy File

An unexpected error is keeping you from copying the file. If you continue to receive this error, you can use the error code to search for help with this problem.

Error 0x80070057: The parameter is incorrect.

The disk was not full and a check disk revealed no errors.

THE SOLUTION
The destination directory name that I was copying into was pretty long, I basically had used a descriptive prefix, a date stamp of YYMMDDHHMMSS, by a space dash space, and a short descriptive comment. All in all it was about ~55 characters in length.

The directory I was copying from was a fairly deep structure.

That made me wonder if the fully qualified name of some directory path wasn’t exceeding some limit. On Windows, it appears to be 256 characters. On a Mac it appears to be 1023 characters.

Tricks aside, I was limited to the file system limits.

So, on the same disk, with the same files, immediately after yet-another-failure to copy, I renamed the destination folder to something considerably shorter and tried again.

Quick experimentation showed that was indeed the problem: the resulting path name formed during the copy was too long.

Solution: shorten the destination folder name and/or tighten up the path.

Hiding Image Files in TextMate

Here’s how to hide JPG, PNG, and GIF files in your TextMate projects so bulk file operations go faster.

TextMateTextMate, perhaps the best generic programming editor that I’ve ever encountered (though I’d be willing to entertain reader suggestions), has the ability to open an entire directory at once, which is great for making bulk changes to automatically generated website files.

However, there’s one trick that I keep having to look up each time I do it, and that’s how to get that side-bar directory listing of the project files not to display image files. The reason you might want to do this is for efficient global replace options across all text-based site files.

The solution is to click the top-level directory in the project, and press the I button in the bottom right corner of the drawer.

This opens a Folder Information dialog box. In the area labeled Recursively Include Contents Matching there are two fields, one for files and one for folders. In the File Pattern field, enter this regular expression: !\.(jpg|png|gif)$

When you close the Folder Information dialog box, all files with the extensions listed will no longer be displayed.

OS X: Batch Rename from GUI

This is the third time I’ve had to go hunting how to enable batch filename manipulations for OS X. Now I’m documenting it so I don’t have to hunt this down again.

I keep forgetting about this trick, so I thought I’d post it in the event I have to ever do it again.

Part of the problem with a graphical GUI is that it’s very difficult to rename files in batches, for instance, prepending some text to a group of files.  This kind of thing is fairly trivial at the command line.

Apple has a facility to do this, but as it’s not something a regular user does often, it’s not enabled by default.  Here’s how to get all kinds of additional functionality out of OS X.

1) Open /Applications/AppleScript

2) Turn on Show Script Menu in menu bar

3) Optional: turn on GUI scripting, show library scripts, and choose where to show them.

You’ll notice up near the time in the menu bar a black scroll has appeared.

All the batch renaming and filename twiddling stuff is under the Finder Scripts.

UPDATE 19-Dec-2009: Upgrading to Snow Leopards deletes some useful scripts, specifically the Finder Scripts.

UPDATE 31-Aug-2010: The scripts live in “/Library/Scripts/Finger Scripts” and are

  • Add to File Names.scpt
    md5 4b0cd899acb19b5fc62ef2049d81a933 – 18114 bytes
  • Change Case of Item Names.scpt
    md5 af7429228be4d0e1a096092af5341c52 – 17808 bytes
  • Replace Text in Item Names.scpt
    md5 716493cab1c569953a7f40d76ed9a1f7 – 24328 bytes