USB 3.0 Hub Stops Working on El Capitan

Has your USB 3.0 stopped working without explanation on your Mac? Here’s how to fix it.

I use a lot of external storage and it has been hard to find a USB hub that is fast, connects all my devices at once, and when using a device doesn’t drop other devices connected to it.
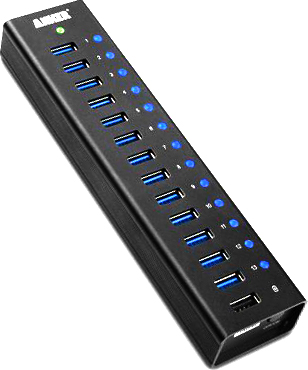
Anker 13-Port USB 3.0I finally found one that’s rock solid; it’s the Anker 13-Port USB 3.0 and it does everything I ever wanted.

Things were good until mid-January 2016 when the device started malfunctioning in strange ways. The first three ports did not recognize any device I put on it.  The other ports sometimes worked and sometimes didn’t. Reliability went out the window and I was forced to stop using it.  My guess was that something burned out. I went so far as to buy another smaller USB 3.0 hub, and well, it didn’t work either — so much so I ended up returning it.  I really wanted this hub working.

Curious, I handed the broken device to an electrical engineer and asked him if he could ascertain what was wrong with it. He took it apart, did diagnostic tests, saw nothing wrong, tried it on his computer, it worked fine, and handed it back to me fixed as just a mystery. However the story doesn’t stop there.

The Impossible Behavior

When I connected the device back up to my Mac, it behaved exactly the same way as it did before. I, of course, tried all my Mac’s USB ports.  I even tried a completely different Mac.  Identical failures.

So sure the device was working, my electrical engineer friend pulled out his Microsoft Surface Tablet, connected the hub, and instantly it worked.

We put it back on my Macs, with the same devices that just worked, it failed. Back to the Surface, it worked.  Back to the Mac, it failed.  In short, it was an electrical engineer’s WTF-nightmare.

The Common Denominator and Other Clues

At this point the problem was clearly related to the Mac.  More over, it used to work just fine, at least until mid-January.  What happened in mid-January?  El Capitan 10.11.3.

Both Macs were running El Capitan 10.11.3.

As a general rule, with Apple, the first generation hardware products have flaws, and the operating systems versions don’t usually get all the kinks out until version x.x.4 is released.  This threw immediate suspicion on the operating system, which meant it was time to check if other folks were having similar issues.

Yes they were.  (See this discussion.)

The Fix

While you’d think that one would need to go to Anker’s Driver Download page, that’s not the case.  You need to do two things:

  1. Reset the NVRAM / PRAM. (For a MacBook Pro it’s the Command-Option-P-R chord on boot.)
  2. Reset the SMC.  (For a MacBook Pro it’s the Shift-Option-Command-PowerOnButton.)

When the machine rebooted the USB hub behaved just like it used to.  Problem solved.

UPDATE (21-Mar-2016): With the introduction of El Capitan 10.11.4, it rebroke the USB 3.0 capabilities again.  The Console reports:

3/23/16 4:32:20.000 PM kernel[0]: 000227.351907 AppleUSB30Hub@14400000: AppleUSBHub::start: failed to set configuration with 0xe00002eb
3/23/16 4:32:21.000 PM kernel[0]: 000228.290970 AppleUSB30Hub@14400000: AppleUSB30Hub::start: failed to set hub depth 0 (0xe0005000)

So far, performing the above steps are not working.

OTHERS ARE HAVING IT TOO: Often the problem manifests as if the USB device, or something connected to it, is no longer working or has inadequate power, or is no longer detected by the host system.

Try your device on an older operating system (ideally the same hardware if you can), a Windows box, a Linux box, or even a Raspberry Pi — you’ll see the USB device works properly there.

YOU CAN HELP: It appears Apple may not know about the problem.

  1. Report it as a bug in OS X via the Apple Bug Reporter.
  2. Provide feedback via http://www.apple.com/feedback/

Please be kind when reporting issue, as these are the people who can help you. Give them technical details and model information to help them track it down.

UPDATE (06-May-2016): Apple has acknowledged issue 26102223 in their system and have asked for more information; I’m forwarding it to them.

UPDATE (09-Oct-2016): SOLUTION — It’s LeapMotion’s Fault!!

It seems that the Leap Motion driver may be the culprit here!

Uninstalling the driver (according to their instructions at https://support.leapmotion.com/entries/39493988-Uninstalling-the-Leap-Motion-software-on-Mac-OSX) caused the device to spring back to life without even a reboot required. Credit and thanks to David Ryskalczyk for hunting this down.

*** Between MAY and OCT, this blog suffered a large data-loss pertaining to the comments left by visitors.  I wish I had the original post by David Ryskalczyk reporting his extensive solution.  Here’s what I can manually recreate.

… I figured that maybe this was a software issue. I proceeded to clean install 10.12 on a USB drive — no issues; then 10.11 on a USB drive — *also* no issues! Seems to be software. From there I started isolating things — first with kexts, which turned out to be inconclusive, then with daemons (looking in /Library/LaunchDaemons and LaunchAgents to see what was installed and running). After removing a bunch of stuff I did additional testing and confirmation to figure out exactly what was causing the problem, and sure enough, it was the Leap Motion runtime!
Hopefully this can be fixed so the Leap Motion drivers can successfully coexist with these USB hubs. … I suspect the real cause is that the Leap Motion runtime is tripping up a bug in the Apple drivers.
I (and others) were able to confirm that David’s fix does indeed work.
Apple, after passing on this information to them, merely marked my bug report closed as a duplicate.
This information was also passed onward to Anker, who was very grateful to have the information for answering support calls about it.
I can also confirm that after months of not having the LeapMotion driver installed, my favorite Anker 3.0 USB has been working like a champ.

Java 8 on OS X Yosemite

I downloaded a recent copy of IntelliJ, only to discover when I went to open it, OS  Yosemite indicated I had no version of Java installed, and that I’d need to install an old version. The “More Info…” button took me to this page:  http://support.apple.com/kb/DL1572

…which didn’t load.  (UPDATE: This fixed the load issue.) Similar detailed install directions also ended up at the same broken page.

So, I attempted to download Java 8 directly from Oracle and  install install it.  The install worked fine, but IntelliJ 14 still did not open.  Same error message.

Here’s how I solved it.  Hop into terminal and do this:

$ cd "/Applications/IntelliJ IDEA 14.app/Contents"
$ cp Info.plist Info.plist-orig
   
$ vi Info.plist    # ... any text editor will do

Find the line that says 1.6* and change it to 1.8*.  Save your file, and now go open IntelliJ as normal.

This causes IntelliJ 14 to use Java JDK 8, and all is right with the world.

Files Gone on Drobo FS with OS X Lion? Get ’em back!

Using DroboFS and OSX Lion only to discover that your Drobo shares have no content!? Yikes! But fret not, you merely have a small corruption problem brought on by the firmware, and in moments you can force a rebuild of that database and all your files will be back safe, happy, and sound with no data loss. Here’s how.

I recently updated my DroboFS to firmware 1.2.0 and dashboard 2.0.3 when I switched to Lion, and while my volume mounted there was no data in it although the Drobo lights showed there was capacity, as did the Drobo Dashboard, and the health reports indicated everything was just fine.

I spoke with Drobo Tech Support that indicated this was a known problem they are actively addressing as high priority; the problem is with Lion and their firmware, and we can expect an updated firmware release.

What’s curious about this is that if one uses the Finder and mounts the Drobo drive with SMB, using smb://Drobo-FS/, the files are there. However afp://Drobo-FS.local/ and cifs://Drobo-FS.local/ mount but reveal nothing.

A detailed description of the problem is at the article entitled: “Missing” Data (AFP) and/or CNID DB Errors. This article then leads to a second one, but is only for the brave.

Using Dropbear (SSH) with Drobo FS to regenerate the AppleDB (CNID DB) has detailed steps for regenerating the apple database.

Walt’s More Verbose Directions

  1. Using the Drobo Dashboard login to your Drobo as Administrator.
  2. Unmount all shares.
  3. Under All Devices / Settings / Admin you’ll want to check the Enable DroboApps setting, which will mount a volume entitled DroboApps on your system.
  4. Download a copy of DropBear from the Drobo Apps page.
  5. Unzip this .zip file, resulting in instructions and a compressed dropbear.tgz file . Move the dropbear.tgz file to the root of the DroboApps directory.
  6. Restart the DroboFS by going to Capacity and Tools in the Dashboard, and selecting the Tools drop down on the right side, and selecting Restart. Or, just power off the unit physically for 20 seconds and then turn it back on.
  7. When Drobo restarts, go to the Dashboard and select All Devices / Settings… / Network. Note the IP address given to the device somewhere.
  8. From OS X’s Terminal enter the command ssh root@theIPaddressAbove
  9. The default password is root, unless you’ve used Dropbear before and followed the instructions within it.
  10. Enter the command ls /mnt/DroboFS/Shares to view a list of shares on the drive.
  11. Tech Support promises the following will not cause any data loss, but anytime you’re doing reconstruction you should always have a backup (if you don’t, question your backup policy), and double check before hitting return. For each share of yours listed above, enter the command: rm -r /mnt/DroboFS/Shares/yourShareNameHere/.AppleDB and press return. Note the period indicating it’s a hidden directory.
  12. Exit Terminal by entering exit.
  13. Using the Drobo Dashboard unmount all your shares, which should be just the DroboApps share at this point; this is under the All Devices / Shares and you just uncheck all the boxes.
  14. Restart the Drobo again (see above if you’ve already forgot how).
  15. And just as important restart any Macs connected to the Drobo.
  16. When the Drobo comes up, start the Dashboard, and test the mounts. They should be working.

Error 0x80070057 (SOLVED)

Copy File

An unexpected error is keeping you from copying the file. If you continue to receive this error, you can use the error code to search for help with this problem.

Error 0x80070057: The parameter is incorrect.

SOLVED!

Went to copy a directory on Windows 7 from one drive to another, something that I had done quite frequently, even earlier that day.

However, this time, and nothing had changed substantially with the source files, I got an Error 0x80070057 message stating “The parameter is incorrect.” At that point the copy dialog from my simple drag and drop would allow me to retry (useless) or abort mid-copy.

The error message was unusually cryptic and less that helpful:

Copy File

An unexpected error is keeping you from copying the file. If you continue to receive this error, you can use the error code to search for help with this problem.

Error 0x80070057: The parameter is incorrect.

The disk was not full and a check disk revealed no errors.

THE SOLUTION
The destination directory name that I was copying into was pretty long, I basically had used a descriptive prefix, a date stamp of YYMMDDHHMMSS, by a space dash space, and a short descriptive comment. All in all it was about ~55 characters in length.

The directory I was copying from was a fairly deep structure.

That made me wonder if the fully qualified name of some directory path wasn’t exceeding some limit. On Windows, it appears to be 256 characters. On a Mac it appears to be 1023 characters.

Tricks aside, I was limited to the file system limits.

So, on the same disk, with the same files, immediately after yet-another-failure to copy, I renamed the destination folder to something considerably shorter and tried again.

Quick experimentation showed that was indeed the problem: the resulting path name formed during the copy was too long.

Solution: shorten the destination folder name and/or tighten up the path.

Mysterious Copyright

This is clearly one of those things I did to myself as a good idea, then forgot about, only to be plagued by it later.

I noticed that all of my photographs on my camera were reporting a copyright with a 2009 year inside the exif data.

I’ve been unable to figure out where it was coming from, resorting to exiftool to remote it.

My natural thought was that perhaps it was some preference in a photo editing tool or a geospatial locator tool. But, no. Turns out I did it to myself.

The Canon EOS Utility has a nifty ability to include a value for the Copyright tag. And about a year ago when I tethered it to the computer, I must have noticed this and set it to some precanned value that includes the year.

It looked something like this:
Copyright (c) 2009 by Walt Stoneburner, All Rights Reserved.

And ever since then, my photos were stamped with that value. Which was fine, back in 2009.

Fixing the problem was as simple as tethering the camera again and firing up Canon EOS Utility. It also gave me an opportunity to update the firmware.

Strange copyright exif data: mystery solved.

Safari Problems Downloading .DMG Files

A number of users are reporting that Safari 4 is no longer downloading .dmg files. Here’s how I fixed the problem when it started happening to me.

A while back I started having problems with Safari 4 being able to download files. Normally when one clicks on a .dmg or .zip file, Safari downloads it.

Recently, it stopped working, either doing absolutely nothing or trying to load the file into the browser itself for display. It was as if the MIME type wasn’t properly being handled.

Here’s how I fixed it.

It appears that Speed Download‘s broswer plugin is to blame. While it works amazingly well with Safari 3, it doesn’t seem to work quite right with Safari 4.0.3.

  1. Quit completely out of Safari.
  2. Go to /Library/Internet Plug-Ins directory and locate the file SpeedDownload Browser Plugin.plugin and move it out of that folder.
  3. Restart Safari.

FIX: undefined symbol: apr_ldap_ssl_init

Did an update to Ubuntu Jaunty and Apache stopped working with the message “undefined symbol: apr_ldap_ssl_init”. This post is how I fixed it.

This is a geek entry for resolving the problem:

* Restarting web server apache2
/usr/sbin/apache2: symbol lookup error: /usr/sbin/apache2: undefined symbol: apr_ldap_ssl_init [fail]

Non-geeks will want to move along…
Continue reading “FIX: undefined symbol: apr_ldap_ssl_init”

Invisible Drive on OS X

The hard drive icon on my OS X’s Finder was no longer appearing on my desktop; here’s how I fixed it.

I happened to sign on to my desktop Mac and noticed something very strange, the Harddisk icon was no longer on the desktop.

Other clever tricks for looking at the file systems showed the file was most certainly present, although Finder operations were treating the volume as if the hard disk was hidden or invisible. The drive was there when I used terminal and did $ ls -l /Volumes

Finder Preferences showed that icons should be shown, but just the drive icon wasn’t appearing.

Then I found this aritcle, which suggested firing up the Script Editor and running this script:

tell application “System Events”
set visible of disk “NameofDisk” to true
end tell
tell application “Finder” to quit
delay 1
tell application “Finder” to launch

I believe I got myself into trouble by accident when I did the last disk repair using Disk Warrior or Disk Utility. Somehow the operation marked the drive as invisible. Undoing it was as simple as asking the system to make it visible again.

Firefox Slow Page Load – Solved

Firefox 3 slow? 20 second page load times? Figured out why. And how to fix it.

A co-worker showed me an interesting problem with Firefox today. He loaded a page from our application (running on localhost) and the page content loaded instantly, but the page load itself didn’t end until a time out 20 seconds later. Literally.

Everything we saw a measured from the browser or from the sending application showed that the content was sent in milliseconds, and the page load was just sitting there doing nothing. We were even using the latest Firefox beta.

Other browsers had no such problem.

Turns out, we figured out what was going on using the Tamper Data add-on.

Turns out there was a Connection: keep-alive in the header. When we changed it from keep-alive to close, the browser behaved as expected. That is, it loaded the page instantly.

A little web investigation showed that when you use the keep-alive attribute, you must also use Content-Length: header, which the sending application wasn’t doing.

A quick application tweak to send the content length, and everything ran super spiffy.

Now, if you don’t have access to the application that’s sending you web pages, you can twiddle with the about:config and change the network.http.keep-alive setting to false.