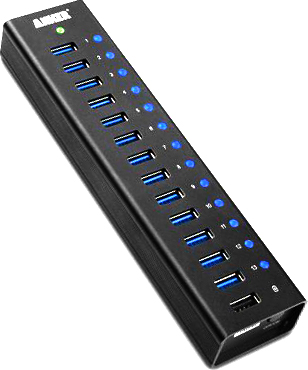
I use a lot of external storage and it has been hard to find a USB hub that is fast, connects all my devices at once, and when using a device doesn’t drop other devices connected to it.
 I finally found one that’s rock solid; it’s the Anker 13-Port USB 3.0 and it does everything I ever wanted.
Things were good until mid-January 2016 when the device started malfunctioning in strange ways. The first three ports did not recognize any device I put on it. The other ports sometimes worked and sometimes didn’t. Reliability went out the window and I was forced to stop using it. My guess was that something burned out. I went so far as to buy another smaller USB 3.0 hub, and well, it didn’t work either — so much so I ended up returning it. I really wanted this hub working.
Curious, I handed the broken device to an electrical engineer and asked him if he could ascertain what was wrong with it. He took it apart, did diagnostic tests, saw nothing wrong, tried it on his computer, it worked fine, and handed it back to me fixed as just a mystery. However the story doesn’t stop there.
The Impossible Behavior
When I connected the device back up to my Mac, it behaved exactly the same way as it did before. I, of course, tried all my Mac’s USB ports. I even tried a completely different Mac. Identical failures.
So sure the device was working, my electrical engineer friend pulled out his Microsoft Surface Tablet, connected the hub, and instantly it worked.
We put it back on my Macs, with the same devices that just worked, it failed. Back to the Surface, it worked. Back to the Mac, it failed. In short, it was an electrical engineer’s WTF-nightmare.
The Common Denominator and Other Clues
At this point the problem was clearly related to the Mac. More over, it used to work just fine, at least until mid-January. What happened in mid-January? El Capitan 10.11.3.
Both Macs were running El Capitan 10.11.3.
As a general rule, with Apple, the first generation hardware products have flaws, and the operating systems versions don’t usually get all the kinks out until version x.x.4 is released. This threw immediate suspicion on the operating system, which meant it was time to check if other folks were having similar issues.
Yes they were. (See this discussion.)
The Fix
While you’d think that one would need to go to Anker’s Driver Download page, that’s not the case. You need to do two things:
- Reset the NVRAM / PRAM. (For a MacBook Pro it’s the Command-Option-P-R chord on boot.)
- Reset the SMC. (For a MacBook Pro it’s the Shift-Option-Command-PowerOnButton.)
When the machine rebooted the USB hub behaved just like it used to. Problem solved.
UPDATE (21-Mar-2016): With the introduction of El Capitan 10.11.4, it rebroke the USB 3.0 capabilities again. The Console reports:
3/23/16 4:32:20.000 PM kernel[0]: 000227.351907 AppleUSB30Hub@14400000: AppleUSBHub::start: failed to set configuration with 0xe00002eb
3/23/16 4:32:21.000 PM kernel[0]: 000228.290970 AppleUSB30Hub@14400000: AppleUSB30Hub::start: failed to set hub depth 0 (0xe0005000)
So far, performing the above steps are not working.
OTHERS ARE HAVING IT TOO: Often the problem manifests as if the USB device, or something connected to it, is no longer working or has inadequate power, or is no longer detected by the host system.
- Mar 9, 2016 – item.224748 – John Bryan
- StaigerTiger on /r/applehelp Reddit
- Kordax in Apple Support Communities
- Ataru-69 in Apple Support Communities
- The Hackintosh Community that’s even got an explanation and workaround. (A well deserved shout-out to TORLEY in the comments below for this one.)
Try your device on an older operating system (ideally the same hardware if you can), a Windows box, a Linux box, or even a Raspberry Pi — you’ll see the USB device works properly there.
YOU CAN HELP: It appears Apple may not know about the problem.
- Report it as a bug in OS X via the Apple Bug Reporter.
- Provide feedback via http://www.apple.com/feedback/
Please be kind when reporting issue, as these are the people who can help you. Give them technical details and model information to help them track it down.
UPDATE (06-May-2016): Apple has acknowledged issue 26102223 in their system and have asked for more information; I’m forwarding it to them.
UPDATE (09-Oct-2016): SOLUTION — It’s LeapMotion’s Fault!!
It seems that the Leap Motion driver may be the culprit here!

Uninstalling the driver (according to their instructions at https://support.leapmotion.com/entries/39493988-Uninstalling-the-Leap-Motion-software-on-Mac-OSX) caused the device to spring back to life without even a reboot required. Credit and thanks to David Ryskalczyk for hunting this down.
*** Between MAY and OCT, this blog suffered a large data-loss pertaining to the comments left by visitors. I wish I had the original post by David Ryskalczyk reporting his extensive solution. Here’s what I can manually recreate.
… I figured that maybe this was a software issue. I proceeded to clean install 10.12 on a USB drive — no issues; then 10.11 on a USB drive — *also* no issues! Seems to be software. From there I started isolating things — first with kexts, which turned out to be inconclusive, then with daemons (looking in /Library/LaunchDaemons and LaunchAgents to see what was installed and running). After removing a bunch of stuff I did additional testing and confirmation to figure out exactly what was causing the problem, and sure enough, it was the Leap Motion runtime!…Hopefully this can be fixed so the Leap Motion drivers can successfully coexist with these USB hubs. … I suspect the real cause is that the Leap Motion runtime is tripping up a bug in the Apple drivers.
