USB 3.0 Hub Stops Working on El Capitan

Has your USB 3.0 stopped working without explanation on your Mac? Here’s how to fix it.

I use a lot of external storage and it has been hard to find a USB hub that is fast, connects all my devices at once, and when using a device doesn’t drop other devices connected to it.
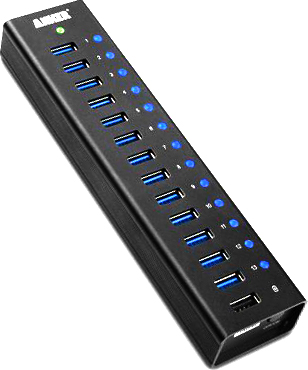
Anker 13-Port USB 3.0I finally found one that’s rock solid; it’s the Anker 13-Port USB 3.0 and it does everything I ever wanted.

Things were good until mid-January 2016 when the device started malfunctioning in strange ways. The first three ports did not recognize any device I put on it.  The other ports sometimes worked and sometimes didn’t. Reliability went out the window and I was forced to stop using it.  My guess was that something burned out. I went so far as to buy another smaller USB 3.0 hub, and well, it didn’t work either — so much so I ended up returning it.  I really wanted this hub working.

Curious, I handed the broken device to an electrical engineer and asked him if he could ascertain what was wrong with it. He took it apart, did diagnostic tests, saw nothing wrong, tried it on his computer, it worked fine, and handed it back to me fixed as just a mystery. However the story doesn’t stop there.

The Impossible Behavior

When I connected the device back up to my Mac, it behaved exactly the same way as it did before. I, of course, tried all my Mac’s USB ports.  I even tried a completely different Mac.  Identical failures.

So sure the device was working, my electrical engineer friend pulled out his Microsoft Surface Tablet, connected the hub, and instantly it worked.

We put it back on my Macs, with the same devices that just worked, it failed. Back to the Surface, it worked.  Back to the Mac, it failed.  In short, it was an electrical engineer’s WTF-nightmare.

The Common Denominator and Other Clues

At this point the problem was clearly related to the Mac.  More over, it used to work just fine, at least until mid-January.  What happened in mid-January?  El Capitan 10.11.3.

Both Macs were running El Capitan 10.11.3.

As a general rule, with Apple, the first generation hardware products have flaws, and the operating systems versions don’t usually get all the kinks out until version x.x.4 is released.  This threw immediate suspicion on the operating system, which meant it was time to check if other folks were having similar issues.

Yes they were.  (See this discussion.)

The Fix

While you’d think that one would need to go to Anker’s Driver Download page, that’s not the case.  You need to do two things:

  1. Reset the NVRAM / PRAM. (For a MacBook Pro it’s the Command-Option-P-R chord on boot.)
  2. Reset the SMC.  (For a MacBook Pro it’s the Shift-Option-Command-PowerOnButton.)

When the machine rebooted the USB hub behaved just like it used to.  Problem solved.

UPDATE (21-Mar-2016): With the introduction of El Capitan 10.11.4, it rebroke the USB 3.0 capabilities again.  The Console reports:

3/23/16 4:32:20.000 PM kernel[0]: 000227.351907 AppleUSB30Hub@14400000: AppleUSBHub::start: failed to set configuration with 0xe00002eb
3/23/16 4:32:21.000 PM kernel[0]: 000228.290970 AppleUSB30Hub@14400000: AppleUSB30Hub::start: failed to set hub depth 0 (0xe0005000)

So far, performing the above steps are not working.

OTHERS ARE HAVING IT TOO: Often the problem manifests as if the USB device, or something connected to it, is no longer working or has inadequate power, or is no longer detected by the host system.

Try your device on an older operating system (ideally the same hardware if you can), a Windows box, a Linux box, or even a Raspberry Pi — you’ll see the USB device works properly there.

YOU CAN HELP: It appears Apple may not know about the problem.

  1. Report it as a bug in OS X via the Apple Bug Reporter.
  2. Provide feedback via http://www.apple.com/feedback/

Please be kind when reporting issue, as these are the people who can help you. Give them technical details and model information to help them track it down.

UPDATE (06-May-2016): Apple has acknowledged issue 26102223 in their system and have asked for more information; I’m forwarding it to them.

UPDATE (09-Oct-2016): SOLUTION — It’s LeapMotion’s Fault!!

It seems that the Leap Motion driver may be the culprit here!

Uninstalling the driver (according to their instructions at https://support.leapmotion.com/entries/39493988-Uninstalling-the-Leap-Motion-software-on-Mac-OSX) caused the device to spring back to life without even a reboot required. Credit and thanks to David Ryskalczyk for hunting this down.

*** Between MAY and OCT, this blog suffered a large data-loss pertaining to the comments left by visitors.  I wish I had the original post by David Ryskalczyk reporting his extensive solution.  Here’s what I can manually recreate.

… I figured that maybe this was a software issue. I proceeded to clean install 10.12 on a USB drive — no issues; then 10.11 on a USB drive — *also* no issues! Seems to be software. From there I started isolating things — first with kexts, which turned out to be inconclusive, then with daemons (looking in /Library/LaunchDaemons and LaunchAgents to see what was installed and running). After removing a bunch of stuff I did additional testing and confirmation to figure out exactly what was causing the problem, and sure enough, it was the Leap Motion runtime!
Hopefully this can be fixed so the Leap Motion drivers can successfully coexist with these USB hubs. … I suspect the real cause is that the Leap Motion runtime is tripping up a bug in the Apple drivers.
I (and others) were able to confirm that David’s fix does indeed work.
Apple, after passing on this information to them, merely marked my bug report closed as a duplicate.
This information was also passed onward to Anker, who was very grateful to have the information for answering support calls about it.
I can also confirm that after months of not having the LeapMotion driver installed, my favorite Anker 3.0 USB has been working like a champ.

Fixing HP Mopier, Collation, and Storage problems (WIN 7)

After upgrading to the latest HP “Universal” drivers, our HP LaserJet CP4525 printers started reporting that they were “Unable to store job at printer”, that they ran out of memory, and were “Unable to collate job at printer”.  The error messages suggested the disk wasn’t present, was full, that I needed to delete files, add RAM, or even a very expensive EIO hard disk. Didn’t get much obvious help from the HP Universal Print Driver Systems Administrator’s Guide either.

I tried adding RAM to the full capacity.  That didn’t help.  Here’s how I ended up fixing the problem, thanks to piecing together dozens of support forum posts for different printer models and a little experimentation.

  1. Go to Start / Devices and Printers (yours may say Printers and Faxes).
  2. Right click the Printer Icon of the printer giving you problems and click Printer Properties (not plain old properties that’s at the bottom).
  3. While on the General table, click the Change Properties button near the bottom left (otherwise you’ll get a read-only mode of grey items).
  4. Change over to the Device Settings tab.
  5. Ensure that the Mopier Mode is set to Disabled.
  6. Ensure that the Job Storage is also set to Disabled.
  7. Click Apply, ideally to see there were no errors in doing this.
  8. Click OK to close the dialog.

Files Gone on Drobo FS with OS X Lion? Get ’em back!

Using DroboFS and OSX Lion only to discover that your Drobo shares have no content!? Yikes! But fret not, you merely have a small corruption problem brought on by the firmware, and in moments you can force a rebuild of that database and all your files will be back safe, happy, and sound with no data loss. Here’s how.

I recently updated my DroboFS to firmware 1.2.0 and dashboard 2.0.3 when I switched to Lion, and while my volume mounted there was no data in it although the Drobo lights showed there was capacity, as did the Drobo Dashboard, and the health reports indicated everything was just fine.

I spoke with Drobo Tech Support that indicated this was a known problem they are actively addressing as high priority; the problem is with Lion and their firmware, and we can expect an updated firmware release.

What’s curious about this is that if one uses the Finder and mounts the Drobo drive with SMB, using smb://Drobo-FS/, the files are there. However afp://Drobo-FS.local/ and cifs://Drobo-FS.local/ mount but reveal nothing.

A detailed description of the problem is at the article entitled: “Missing” Data (AFP) and/or CNID DB Errors. This article then leads to a second one, but is only for the brave.

Using Dropbear (SSH) with Drobo FS to regenerate the AppleDB (CNID DB) has detailed steps for regenerating the apple database.

Walt’s More Verbose Directions

  1. Using the Drobo Dashboard login to your Drobo as Administrator.
  2. Unmount all shares.
  3. Under All Devices / Settings / Admin you’ll want to check the Enable DroboApps setting, which will mount a volume entitled DroboApps on your system.
  4. Download a copy of DropBear from the Drobo Apps page.
  5. Unzip this .zip file, resulting in instructions and a compressed dropbear.tgz file . Move the dropbear.tgz file to the root of the DroboApps directory.
  6. Restart the DroboFS by going to Capacity and Tools in the Dashboard, and selecting the Tools drop down on the right side, and selecting Restart. Or, just power off the unit physically for 20 seconds and then turn it back on.
  7. When Drobo restarts, go to the Dashboard and select All Devices / Settings… / Network. Note the IP address given to the device somewhere.
  8. From OS X’s Terminal enter the command ssh root@theIPaddressAbove
  9. The default password is root, unless you’ve used Dropbear before and followed the instructions within it.
  10. Enter the command ls /mnt/DroboFS/Shares to view a list of shares on the drive.
  11. Tech Support promises the following will not cause any data loss, but anytime you’re doing reconstruction you should always have a backup (if you don’t, question your backup policy), and double check before hitting return. For each share of yours listed above, enter the command: rm -r /mnt/DroboFS/Shares/yourShareNameHere/.AppleDB and press return. Note the period indicating it’s a hidden directory.
  12. Exit Terminal by entering exit.
  13. Using the Drobo Dashboard unmount all your shares, which should be just the DroboApps share at this point; this is under the All Devices / Shares and you just uncheck all the boxes.
  14. Restart the Drobo again (see above if you’ve already forgot how).
  15. And just as important restart any Macs connected to the Drobo.
  16. When the Drobo comes up, start the Dashboard, and test the mounts. They should be working.

Apple Magic Mouse Sleeping on Win7

My bluetooth Magic Mouse kept falling asleep. Here’s how to keep it away.

My Apple Magic Mouse was “falling asleep” on me in Windows 7.  Found this post that told how to resolve it.

1. Click on the “Bluetooth Devices” blue icon in the system tray (you’ll probably need to click that little UP arrow first) and choose “Open Settings” from the menu.
2. Under the “Hardware” tab of the resulting dialog, select the “Apple Built-in Bluetooth” device and click the “Properties” button on the lower right.
3. Under the “General” tab in the resulting dialog, click the “Change Settings” button on the lower left (it has a shield icon on it)
4. Under the “Power Management” tab in the resulting dialog untick the “Allow the computer to turn off this device to save power” checkbox.
5. Press OK, OK and OK.

But for me, the Hardware tab was located under “Dell Wireless 573 Bluetooth Module with AMP.”

NTFS on OS X

Trying to write to an NTFS volume on OS X, and all you find are third party packages and complicated config file manipulations asking you to reboot? Do this….

Every once in a while someone brings over an external NTFS formatted drive and plugs it into my Mac to exchange some large data sets. While the Mac can easily read NTFS, it doesn’t appear to have the capability to write to that file system.

Appears is the operative phrase.

If you search for a solution in the open, you’ll find companies selling commercial products, drivers, and mounters. Some people have posted complicated looking instructions telling instructing you to mess with low level system files, that may or may not exist, ending in a full system reboot that typically solves the problem for that lone drive.

NTFS on OSXHere’s the generic no-software required solution.

First connect your NTFS drive to the Mac, it’ll mount with some name like “My Disk.”

Open a Terminal window and enter the command:
$ mount

The mount command will tell you what drives are listed. Find the one that has your drive name listed in it and copy the device name:
/dev/disk1s2 on /Volumes/My Disk (hfs, local, nodev, nosuid, journaled, noowners, mounted by me)

Now eject the drive, but don’t disconnect it from the machine.

Go manually create the directory (shown in bold above); this is where the mount point will be:
$ cd /Volumes
$ mkdir My\ Disk

NOTE: The backslash escapes the next character, in this case allowing a space in the directory name.

Now, mount the drive as read-write using this command:
$ sudo mount -o rw -t ntfs /dev/disk2s1 /Volumes/My\ Disk

Make sure that you’ve used the same device location you copied down the the prior steps.

At this point your drive should appear on the desktop, and you ought to be able to read and write to it just fine. No rebooting necessary!

Note that you can get to it from the Terminal as well:
$ cd /Volumes/My\ Disk
$ ls

Note that sometimes Finder may act a little wonky with timing problems and a huge file. Apparently the underlying Unix system has no problem. You can copy a big file to the drive:
$ rsync –progress SuperBigFile.zip /Volumes/My\ Disk

Or a whole directory:
$ rsync -r –progress LargeDeepDirectory /Volumes/My\ Disk

When done, make sure you are not running any programs that are accessing the drive or have their current directory set to the drive:
$ cd /Volumes

Then, eject the drive normally, or unmount it from the command line — your choice.
$ sudo umount /Volumes/My\ Disk

Full disclosure and warnings: This was tested on OS X 10.6.5, though support has been around to do this for a while. And, any time you’re doing something that deals with questionable file system access, make sure there’s nothing on the drive you don’t mind losing. Have a backup. There’s always a slight risk, but it’s very close to zero — why state all this? Because I assume no responsibility if something goes wrong.

Mysterious Copyright

This is clearly one of those things I did to myself as a good idea, then forgot about, only to be plagued by it later.

I noticed that all of my photographs on my camera were reporting a copyright with a 2009 year inside the exif data.

I’ve been unable to figure out where it was coming from, resorting to exiftool to remote it.

My natural thought was that perhaps it was some preference in a photo editing tool or a geospatial locator tool. But, no. Turns out I did it to myself.

The Canon EOS Utility has a nifty ability to include a value for the Copyright tag. And about a year ago when I tethered it to the computer, I must have noticed this and set it to some precanned value that includes the year.

It looked something like this:
Copyright (c) 2009 by Walt Stoneburner, All Rights Reserved.

And ever since then, my photos were stamped with that value. Which was fine, back in 2009.

Fixing the problem was as simple as tethering the camera again and firing up Canon EOS Utility. It also gave me an opportunity to update the firmware.

Strange copyright exif data: mystery solved.

Garmin WebUpdater

I own a Garmin GPSmap 60CSx in order to geoencode my photography using HoudahGeo.

Garmin now has a means up updating the firmware in their GPSs by using a WebUpdater, of which I use the version for the Mac.

I Got Myself Into Trouble
In retrospect, I got myself into trouble by starting the program, it failed to detect the GPS, to which I turn on the GPS, and plugged it into the USB port. While the WebUpdater saw the device and went to update, it stayed in the “Erasing… Do Not Unplug” state for about two hours before I got brave.

What I Did, And Boy Was I Lucky
I couldn’t cancel. I couldn’t Quit. So I had to Force Quite by using Command-Option-Escape, that at least got WebUpdater to stop. The GPS was still stating “Loader Loading…” when I pulled the USB, and when that didn’t change anything, I turned off the power to it. I wasn’t so sure I was going to see much of anything when I powered it back on.

I got lucky. I turn the power back on and I was still at the old revision. Then plugged in the USB to the computer. Then started WebUpdater, which again noticed the GPS version, downloaded the firmware again, and had no problems installing it. Seems doing things in this order works just fine.

My Plans If I Was Unlucky
Over on Bill Turner’s site, he’s written an article about Fixing a Dead Garmin GPSMap 60CSx. It seems he’s learned holding down the Power Button and the Up Arrow at the same time while starting the WebUpdater software (I think he has three hands to pull this off), he’s able to force the GPS to identify itself to the updater. Problem is, according to his instructions, you have to keep holding down these button chord during the update; some comments on the blog state it isn’t necessary, and there’ve been mixed results as to whether this works universally or not.

I’m not sure I would have had the bravery to just go killing processes plain outright, but since Bill did such a nice job of providing an alternative, I felt it was worth the risk — even if I didn’t have to go that route. Thanks Bill for blogging your GPS recovery notes.

Macbook Pro Screen Goes Dark on Wakeup

My MacBook Pro should have woken up when I lifted the lid, but all was dark. However, while checking the battery level, I noticed it had woken up. The problem was the backlight wasn’t coming on. Here’s the solution. It isn’t the brightness button either.

Today I learned that there’s a nifty little utility called Maintenance 3.8 out on Apple’s site. You can find it by going to Apple / Mac OS X Software…, and when the web page pops up, type Maintenance in the search box.

It’s an automator script to repair permissions, verify preferences, updating prebindings, do cleanup, update databased, rebuild indexes, empty Trash, and so forth. My guess is it’s much like Onyx.

Deciding to give it a try, I downloaded it, opened the .DMG file, and double clicked the automator icon, selecting Restart when done. And while I got a very little in the confirmation department that things were working, I saw a lot of CPU activity running utilities I was familiar with.

So, with the laptop plugged in, I left to to chug away. I heard the restart sound several minutes later. And, I ignored it.

Later, I picked up my laptop and went to login.

Nothing.

The “breathing LED” on the front was off, and nothing was responding keyboard or mouse wise. The screen was black.

So, I decided to check the battery. Full power.

But then I noticed something. At the steep angle, in the near pitch black of my LCD screen, I saw the login window. What was happening: the backlight wasn’t coming on. Fiddling with the brightness control didn’t help either.

Sure enough, I could make out the cursor once I located where it was.

I tried opening and closing the lid. Nope. Backlight still off.

So, I restarted (as I mentioned, it was operational, I could barely make out the GUI).

The machine sprang to life, showed me the blue background, and right before it went to the login screen, the backlight cut out again, leaving me in pitch black.

Titling the screen back again (with the keyboard sticking up in the air and the screen flat on the table), again I could make out the login box and mouse. I did a restart again.

This time I held down Command-V as it booted. And I watched as it came up, lots of normal diagnostic messages, and then the blue background, and right as the login screen appeared, back to pitch black.

Annoying. But now I’m wondering if all the times I’ve ever woken my laptop after a case where the lid didn’t quite clasp perfectly, was this what was happening — could the machine be up, but the backlight off?

So, one last time, I restarted. Only I held down Command-Option-P-R (four fingers) to reset the power management settings. Several chimes later, I let go, and the machine booted perfectly, and the login box appeared, backlight and all.

I’m hoping that my experience may lead to an additional piece of the puzzle about the Mac waking up funny. I would have never have noticed anything on the screen if I looked at it dead on, as I always do.

It’s fairly well known that if you close the Mac’s lid, but down engage it fully, the lid will pop back up, but not after putting the machine to sleep. At that point, it becomes a little dance with the lid, trying to get the lid back down, so that the machine can see it re-open, and that usually wakes it. But sometimes the screen is still dark, and you have to play with the power button (and if frustrated, hold it down to restart).

Sometimes this same problem manifests when you wake the machine, enter your password, and suddenly everything goes dark. You wiggle the cursor and hit the keys and nothing happens. Caps Lock toggles, but it feels like it’s gone back to sleep.

Well no more. From now on, I’m going to tilt my screen back and see if I’m operational. That way I won’t lose data from an unnecessary restart.

Sticky Fingers: Logitech Mouse

Ok, not making this up. It’s been so long since I used my home Windows system that the plastic on my mouse is decomposing. Literally. Not the rubber. The plastic housing. The hard plastic.

This will give you an idea of how long it’s been since I’ve used Windows at home.

I had to hook up an LCD monitor to the Windows box, boot the system, and install a pile of updates [1 WGA; 34 express; 2 custom]. However, something else gave me a true sense of the time that had passed: when I moved the mouse, I felt something oily and sticky on my thumb. The plastic mouse had degraded.

Upon closer inspection of my Logitech iFeel MouseMan (M/N: M-UN53b; P/N: 830445-0000), the thumb button had ooze dripping on it.

Where did it come from? The answer was obvious. There was a thumb print above the button, where the hand naturally rests.

Apparently the natural oil in my hand left a finger print on the mouse. Undisturbed for so long, the plastic broke down and started becoming liquid mush in that one spot.

I’ve never heard of a mouse breaking down like that, but I’m holding the evidence in the palm of my hand.

Now, the larger question: do I buy a new mouse? Nah, Windows isn’t worth the pocket change or that level of effort to me anymore.

Dell Inspiron E1505 Mouse Pointer Problem

The cursor on a new Dell Inspiron E1505 laptop with an ATI Mobility Radeon X1400 graphics card running XP Home looks like a vertical bar, not a pointer. Here’s the fix.

Today’s tip comes from John Cook, who reports that upon purchasing a new Dell Inspiron E1505 laptop with an ATI Mobility Radeon X1400 graphics card running Windows XP Home Edition Service Pack 2 (build 2600) and using the “Synaptics PS/2 Port Pointing Device” as a mouse, the cursor appears as a vertical bar.

Unfortunately, there’s nothing on the Internet that tells how to correct the problem.

SOLUTION: The problem is with the hardware acceleration.

Right click the desktop, choose properties, go to the Settings tab, click Advanced, choose the Troubleshoot tab, and slide the slider one notch to the left. Click Ok, then OK.