Found: The Best iPhone Development Book So Far

Want to write your own iPhone applications but Objective-C, XCode, Interface Builder, and the steep learning curve of Cocoa getting in the way? Have I found the book for you.

Warning: long and geeky post follows — iPhone wanna-be developers, read on!

Beginning iPhone Development - Exploring the iPhone SDKI’ve found it, finally, the best iPhone development book so far! Read on to see why.

Fairly recently, I decided to turn my attention to native iPhone application development, but I found the arena a little sparse when it comes to what I’d call good documentation.

For some perspective, I’m a software developer of 20+ years with background in Unix and Windows; I’m very well versed in C, C++, C#, and Java, among a good number of other higher-level languages, having produced a number of enterprise applications.

You’d think that picking up Objective-C and the Cocoa Touch frameworks would be a fairly simple task. However, the moment you step foot into the pool, you’re get a cold shock at how much you don’t know and it can feel daunting enough to want to retract back to familiar territory.

Don’t give up. It is easy.

Looking forward into the unknown presents a much more gloomy impression than when you’ve taken a few steps and looked back to see just how far you’ve come and in such a short period of time.

Here’s what’s happening: The Apple Frameworks represent a large and mature collection of some impressive code. The closest experience I’ve felt to it, and this is admittedly a horrible analogy, is Ruby on Rails.

With Rails, there’s so much going on by convention that you have to sling very little code to get impressive things to happen. This makes it hard to understand: there is no code to trace.

Same way with the Apple Foundation classes that are based on NeXTSTEP — a lot is handled for you, and often in new ways you might not have thought about because of limitations of other platforms, so that very little code is required to do something quite impressive. The problem is figuring out what that code is you’re supposed to write, and more importantly how’d you know to go about doing that in the first place. Hint: knowing the Foundation Framework is important to understanding the Cocoa Touch Framework.

This leaves one in the lurch that the sample code appears rather sparse, and the framework documentation overwhelming, with little guidance on how all the pieces fit together into a simple, cohesive whole. The problem is all too common.

My biggest gripe with many frameworks, especially Java and it’s auto-generated documentation, is that all you’re really presented with is a list of method signatures with very little discussion about what they do, purpose and limits to the input values, discussions of side effects, the importance of call order, and so forth. With other languages, you’re lucky if you can find the header file to include or the library file to link against. It’s all just expected that you somehow know this, and that doesn’t work when you’re learning a framework, though it’s fine if you just need a reference.

Apple’s online documentation is certainly comprehensive, but the reality is you’re going to be watching videos and reading tons of documentation, picking up crumbs of useful bits as you go. The cohesive moment of comprehension will come, but it will be a long and slow ride. You want something faster.

If you’re learning Objective-C at the same time, the ride is extra bumpy, because not only are there just a few language extensions sitting on top of C, but the ObjC library is actually doing some clever work that you want to know about, and this has additional implications because there’s a lot of convention going on as well. Further obscuring things is the fact that, due to historical reasons, the terminology you are most likely already familiar with doesn’t map nicely. A nice look under the hood solves this. Objective-C isn’t just some new keywords, it’s new application behavior.

What’s Wrong With Other iPhone Books At The Moment
As of early 2009, you’re going to find few iPhone books out there. Most of what exists is for the hacked version of the iPhone, and while that may even sound useful, the tearing apart of the SDK is rough and incomplete, not to mention the implementation to call is painful. This just isn’t applicable to the real world constraints of native mode development.

Think you can get by with a slightly out of date copy of a Cocoa book? Think again. The UIKit framework is just different enough that your approach needs to be slightly different. Tight, efficient, resource management becomes very important.

Also, unless you already know and understand Interface Builder, it can be a hard time following along when your book doesn’t match your software version. Apple keeps modifying Interface Builder, making it better, but the changes can come across as so dramatic, interface-wise, that to the new comer it looks like a totally different application each revision. Once you “get it” the sweeping changes are cognitively transparent. The iPhone SDK includes, you guessed it, a new XCode and Interface Builder.

What few modern iPhone books there are out there jump straight into a technical feast of SDK details, leaving the reader with a learning curve that’s as vertical as a brick wall.

What’s needed is a book that introduces only what you need to know, when you need to know it, explaining tips and tricks along the way, delving into the philosophies of why things are the way they are, what the developers were thinking, how the frameworks are structured, what the conventions are, and when those conventions aren’t followed. And, instead of showing you the end solution all refactored into a neat package, take the long way, when needed, to introduce you to what’s going on and then evolve into the optimal solution.

I’ve Found Such A Book!
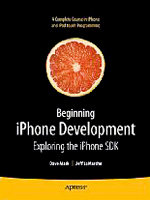
The book, by Apress, is called Beginning iPhone Development – Exploring the iPhone SDK by Dave Mark and Jeff LaMarche. This book is about the fundamental concepts you need to understand in order to make the frameworks do their magic.

Its tutorials are very well constructed, easy to follow, and are specifically designed to teach the framework in such a way as you understand what’s going on and learn to fish for yourself.

This is in stark contrast to substandard books that merely cover a framework’s capabilities with cut’n’paste examples that have little bearing to real applications. This alone gives is five out of five stars by my standards.

My only complaint is a minor nit that there are a small handful of typos, and unfortunately, they happen in the code examples. However, they’re glaring, and you won’t get tripped up by them. (For example, on page 85, the tutorial is about UIImage. And, UIImage appears four times in a six line sample. The first one, however, says “jmUIImage” and the indentation is off. It looks like a macro expansion, a note, or the mangled initials of one of the authors. The code won’t compile with it, and it’s obvious from context what it should be.) To me, this is forgivable. Especially since it’s rare.

Tagging 1430216263
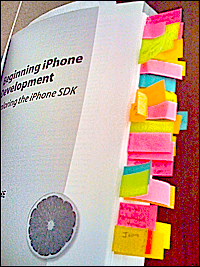
I want to show you something.

I have a habit of tagging my books when I find an exceptional piece of information that I haven’t found elsewhere. I give a book high marks if it earns somewhere between three to seven tags, as the majority of my collection never gets any tags. Tagging, for me, is not note taking — it’s rare event.

I think the picture speaks for itself.

For Example…
So, at this point, I present for my own edification and future reference, some of that tagged content. Who knows, maybe something you see here might just get you traction on the learning curve.

– In Objective-C, colons are a legal character of the method identifier, they are not syntactic sugar.
– Even though a number of macros translate to nothing, void, zero, or null under the hood, their presence provides important hinting for data types and method calls.
– The NIB’s File’s Owner is a place holder for the class that loaded the NIB file.
– The NIB’s First Responder is the object the user is currently interacting with.
– The application icon is a 57×57 .png file, see Info.plist’s Icon File.
– The iPhone specially optimizes .png files so this is the best format.
– Reset the iPhone Simulator by deleting its directory from ~/Library/Application Support
– You want to use @property (retain, nonatomic) as often as possible.
– Interface Builder uses your defined accessors to properties, which use retain; that means you do need to deallocate Interface Builder objects, even if you didn’t instantiate them.
– There are four control states on a control, often you want UIControlStateNormal.
– Learn to use retain/release, there is no garbage collecting on the iPhone.
– It’s better to init/release than using factory methods; factories use autorelease pools, and while this will work, it often keeps resources around longer than you intend — avoid autorelease pools.
– Hog too many resources, whether CPU or memory, and the phone will reboot.
– Everything from UIApplication on down will fire messages to Delegate objects at certain well-defined times, you need to learn what these times are and what messages are sent; it’s not just subclass avoidance.
– You can Option-Click on a class or interface name in XCode and go right to the documentation.
– You can press ESC to cause auto complete to happen immediately.
– Command-equal_sign will size a control to fit.
– When you’ve got a lot of control hierarchies going on, use the View Mode button to see them as a list.
– Scaling an image takes computational overhead, avoid if you can.
– Set the Alpha slider to 1.0 in order to optimize the drawing sequence, it skips looking at the underlying background and factoring it in — it applies to the image drawn.
– Also set the Opaque checkbox in order to optimize the drawing sequence, it skips drawing the underlying background for the parts where the image is transparent.
– The Tag control allows you to assign a numerical identifier to controls to locate them later.
– You need to handle the Did End on Exit event in order to make the keyboard go away.
– You may also need a huge, invisible, custom button as well to make the keyboard go away.
– In XCode, use Option-Command-up_arrow to toggle between a header and its source file.
– In the Interface Builder, move the cursor over a view and hold down Option to see how many pixels there are between the item and its superview.
– Option-dragging a control in Interface Builder makes a copy.
– Nifty buttons are actually stretchable images, and Apple has buried a ton of them free for your use in the UICatalog sample code on their site.
– There are three different ways to handle layouts when rotation happens: autosize, reposition, and view swapping.
– The rotation callback passes you the orientation the phone came from, you need to use other means to get the current orientation.
– If you want to use Core Graphics, for things like view transitions, you need to link the framework into your application.
– Some frameworks, like Core Graphics, have one version for the iPhone hardware and one version for the iPhone Simulator.
– If you use the correct parameters, XCode’s build process can play games with the path and always target the right framework (use Relative to Current SDK, and do not select Copy items).
– Right-click the Resources folder and use Add / Existing Frameworks… to do this process in a safe way.
– If a view isn’t shown, it’s superview is nil.

…there’s plenty more, but you get the idea. The book is jammed with all kinds of useful things to someone who is new to iPhone development. This presentation of material makes the learning curve very approachable.

And, once over that hurdle, all those other books that I said were problematic suddenly make a whole lot of sense.

This book is the best first step I’ve seen in the journey to writing iPhone applications. Period.

Walt gives “Beginning iPhone Development” two thumbs up, five stars our of five starts, and a head nod of appreciation to the authors. Well done, guys. Well done.

Jaw Dropping Photo Retouching

Put aside everything you think you know about photo retouching, as here are some serious resources for doing it just as the pros do.

In addition to capturing the perfect image and having the perfect lighting, you also need to know how to do photographic retouching.

While many of these sources revolve around Adobe’s Photoshop, you can also use Corel’s Painter, Gimp, GimpShop, or even Pixelator.
Yes, you know to shoot in RAW mode.

You may even know about Raw Developer, to eek out what your photo editing software can’t.

Huey Pro by PantoneYou might even know about the Pantone Huey Pro, which is the dual-monitor color calibration device.

Forget everything you know or think you know, here are the sources you need for high-end professional photo retouching!

Color Correction


A good photo has to take into account its color space, and it turns out the simple color wheel model is actually fairly simplistic. A color space looks more like a stretched and distorted multi-dimensional field. By deliberately contorting the color space, it’s possible to do everything from white-balance to invoke moods to increasing contrast.

Additionally, your camera has the ability to pick up more detail that you’re able to discern or your monitor can display. By stretching and twisting the color space, you can draw out more details in areas where you need it.

Instead of using the Levels control, building a strong command of advanced Curves will do wonders. Curves can be used on different channels. And, with selective masking, it’s possible to create images that are physically impossible for a camera to capture.

Curves effectively do a translation, but instead of linear relationship, the change can be dramatic in some places, less so in others. Think of it like a color spectrum on a rubber band, you can stretch portions of it.

The eye dropper tools in the Curves dialog help identify what should be considered white, what should be considered midtone, and what should be considered black for transformation. It may come as a surprise that it might not be ideal to have a pure black or a pure white.

Mastery of Curves allows you to deal with under exposed, over exposed, and color casted images. With a well exposed picture, it will help make the subject pop. It also affords some very clever use of creative coloring. And let’s not forget controlled desaturation can lead to many splendid images.

Once you learn how to really use Curves, you’ll have no need for Levels.

Certain color-space models play off of different strengths. Color need not be RGB.

Print, for instance, looks great when CMYK is used.

It turns out that for drawing out detail, LAB color space makes a world of difference.

LAB space is magical because it puts the luminance on it’s own channel. The tradeoff is that red/green become opposites on the ‘a’ channel, and blue/yellow become opposites on the ‘b’ channel. This works well, as often it’s the brightness you want to affect without washing out the color. For instance, LAB mode can remove unwanted fog and haze, magically pulling color out of seemingly nowhere.

Additionally, the Unsharp Mask can be applied to just the luminosity channel, pulling out extra details. If there’s noise in an RGB’s blue channel, one can covert to LAB, apply the Dust’n’Scratches filter to the B channel, and convert back. Blurring A and B will hide imperfections.

The A and B channels can be used to accent color. And if an image has an unwanted color cast, moving the curve out of A’s or B’s center point removes it.

LAB also has another amazing use: getting amazing selection masks from the channels.

Color Enhancement


Scott Kelby, a Photoshop guru, has identified that there’s really only seven steps needed to really push an image to the limits. This can make a horrible picture acceptable, and a well exposed image astounding.


  1. Use Open the file in RAW mode, even if it’s a JPEG, and pre-process there.
    Fix the white balance, and then do things like warm it up. Fix the exposure and twiddle the details. Information that’s clipped can be brought back into the color space.

  2. Perform the Curves adjustments.
    Bring out detail.

  3. Adjust the Shadows and Highlights.
    Pull out more detail, and set the mood. Good contrast makes a dramatic photo.

  4. Paint with light.
    Layers, gradients, and layer blending can simulate camera filters. A neutral density, for instance, can bring out the blues in your skies. In a more controlled sense, this is non-destructive dodging and burning.

  5. Channels Adjustments using LAB color space.
    By applying an image to itself with soft light, in LAB mode this produces aesthetic contrasts.

  6. Use Layer Blends and Layer Masks.
    Often the whole image won’t need uniform changes, this step brings all the elements together.

  7. Sharpening with the Unsharp Mask and fading the Luminosity afterward.
    Extra sharpness can be pulled out to provide what looks like a really in focus image. Doing it this way removes color halos that may appear.
You don’t apply every step for every photo, and it’s important to recognize less can be more. The cumulative effect of these steps is what get results. Also worth mentioning, the order is important.

Professional Retouching


Most retouching instructions inadvertently make a model’s skin look like plastic. They focus on the Gaussian Blur filter, screening layers, and use the Clone tool, and the Spot Heal Brush. This might be acceptable for small web images, assuming you want that look.

It’s not what the professional do.

Why not? Those activities destroy information in the image. That means the image looks fake and retouched when viewed up close or when it appears in print.

To do things right, you need a solid command of color spaces, the Healing Brush, the History Brush, Dodge/Burn brush, Warp/Liquify tools, and Unsharp Mask. Most changes are made with Adjustment Layers, so the image is actually a composite of small, controlled alterations. This is time consuming and can be tedious if you don’t know the numerous shortcuts of your post-processing application.

To make a clean image, one uses the Healing Brush with sampling from all over the image. Reshaping parts of an image requires the Liquify tool, and to alter the whole image the Warp tool is used. These activities can damage data, which is why after using them cleanup with the History Brush is necessary. The goal is to preserve detail and remove imperfections.

Since the magic of photography is in capturing the light, not the subject, having controlled contrast makes an image stand out from the rest. What makes a good professional photo retoucher isn’t the blemish removal or pushing of pixels, it’s the re-sculpting of the image in 3D.

In this context, I’m not talking about modeling tools like Poser, Blender, Animation:Master, or DAZ:3D. No, I’m talking about the illusion of depth created with shadows and light.

Face Painters are do this to reshape the face, using smooth gradient blending and edges to create fantastic illusions. The dodge and burn tools, along with an decent understanding of human anatomy, will let you get a model closer to that perfect body.

The insight comes when you realize things that are further away are darker, and things that are closer are lighter. By performing slight emphasis on naturally falling light, shadow, and edges, it’s possible to enhance the perceived depth of the photo’s subject. By adding or removing light, it’s possible to alter the shape of the subject in very flattering ways that are not perceptible unless you compare the image to the original.

Total reconstruction is possible when sampling can be used to build the right textures, hue and saturation can set the right colors, and dodging and burning can create the right shadows to convey a shape or edge.

Bringing It All Together


The name of the game is contrast and sharpness, and with the resources above, you’ll be able to produce some jaw dropping images.

Mind you, there’s no magical automated formula. One image can take literally hours, but the results are worth it.


Photo by Walt Stoneburner

Three Photography Books You Need

Here’s three great photography books you’ll want in your library that you might have overlooked at the bookstore. Two cover how to take an amazing photograph, the other is how to compose them.

Photography, good photography, is a complex and deep subject, primarily that it’s an art about making trade-offs. A while back, I wrote about The Best Photography Books Ever on Light.

I’d like to now share three photography books that you need in your personal library.

The first two come from Scott Kelby, whom you may know from the National Association of Photoshop Professionals (NAPP) because he’s the Editor in Chief of the Photoshop User magazine.

If you’re one of “those” people, hang in there. It’s worth it.

Scott Kelby. People either love him or hate him. He has two common complaints against him, which I personally think are unfounded or are at least irrelevant. The first is that he has a ‘unique’ writing style which injects a bit of humor into his books. I like it, it makes them more personable and less dry; some want him to cut to the point. The second is that people accuse NAPP of being just a Scott Kelby fan club, and that he can do no wrong. I haven’t seen that, I just know I’ve learned more new tricks from Photoshop User than elsewhere. Kelby is good, Kelby delivers, and so do these two books. If you’re an Anti-Kelby person, at least browse them when you feel no one is looking.

The Digital Photography Book, Volume 1

The Digital Photography Book
Volume 1

 The Digital Photography Book, Volume 2

The Digital Photography Book
Volume 2

The trick here is not to make the mistake by looking at just the covers that one book is a reprint of the other. They are two separate books, and you want both.

The Digital Photography Book (ISBN 0-321-47404-X) addresses how to get really tack-sharp photos by doing things like using the lowest ISO, good quality glass, turning off your image stabilizer, using a sturdy tripod, finding the “sweet spot” in your lens, locking your mirror up first, and using a remote shutter release. Yes, it covers how and why.

You even get tips on how to do a bit of post-processing for extra sharpness, using Unsharp Mask and LAB Colors (not RGB). Even if you’ve done photography for a while, there’s gonna be stuff in here you most likely didn’t know. Or didn’t know how to do well. Or easily.

There’s also practical advice along with little cheats you can do. You’ll understand a light a little better and manipulate the scene to get those wonderful backgrounds and deal with problem lighting problems. If you got yourself committed to taking wedding photos, there’s an important section you need to know.

A lot of photography has to do with composition and compensation. Ever notice how two photographers with the same gear can take a picture of the same thing, and one gets an incredible shot, and the other gets a boring and flat images. You’ll learn why and how to get the good shot.

There is even a wonderful section on how to take fantastic portraits; a section on avoiding mistakes; equipment recommendations; and even a section that shows “if you want this kind of photo then do this.”

The Digital Photography Book, Volume 2 (ISBN 0-321-47404-X) covers flash and strobes, reflector tricks, impressive seamless/colored backgrounds, advanced light metering, and how to get those multi-light touches on your subject. More portrait tricks are revealed, along with low-light, sunrise, sunset, and landscape scenes. More is covered on bad weather conditions, weddings, and touring. Again, there’s a shot recipe section in the back. This book is clearly a continuation of the first and not an afterthought or a sequel to make more sales. Good quality stuff.

The next book in your collection should be The Photographer’s Eye by Micheal Freeman (ISBN 0-240-80934-3).

Composition is hard to master. Things like frame dynamic, tension, placement, rhythm, etc. all seem pretty artsy-fartsy hand-waving mumbo-jumbo to anyone who’s trying to study the science behind creative photography.

This book explains with contrasting visuals what these terms mean and what you can do to get them. A fantastic illustration (p. 25) shows a bench in a field, but simply by cropping and using angles, the viewers eye is compelled to follow in different directions.

You’ll see how and why the rule of thirds works, how there’s also the golden ratio frame, fibonacci divisions, geometrical slicing, and fractals as alternate methods of placement. You’ll know when to fill the frame, when not to, and where not to. You’ll control the horizon. Convey balance though perceived weights, not just mirroring placement. Foreground, background, contrast, repetition of patterns, broken patterns, perspective, forced perspective, limited color, …there’s so much here.

This book alone will change the way that you view a scene and provide you many different ways to capture it, both in camera and how to make an even more impressive photo by elimination back post-processing.

So there ya have it. Two books to take a really amazing picture, and one book to compose a fantastic one.

REVIEW: Walt gives all three titles here two thumbs up!

Overcoming Writer’s Block

Recently I discovered that one of my favorite authors put out a book on writing, called Weinberg on Writing: the Field Stone Method.

Well, on a lark, I decided to purchase the book from Amazon, and I have to say, not only have I not been able to put the book down, but it has truly inspired me about writing in ways that no English book ever could.

Basically, Weinberg draws parallels of building a wall with field stones (no mortar) to that of writing. He starts by stating that how we read, sequentially, is not necessarily how we write. Additionally, when we see today’s electronic medium, full of indexes and hyperlinks, this is merely presentation, and, again, has no bearing on the writing process.

Instead, he points back to a time in his life when he became addicted to morphine from some nasty surgeries and broke the addiction. He explains that addition is a very clever and evil process. It requires that you do something in the short term that makes you feel better, but with the side effect that it actually makes you feel worse in the long term. So, you do the activity again, and you feel better, but then after it passes, you feel even worse. Quickly you run into a terrible spiral.

However, smart and creative people can break that cycle. How so? By finding something else that makes them happy. Instead, they don’t end up with feeling worse; they simply build upon repeated successes.

He then discusses how when he’s faced with a project that’s not going well, or a deadline, or even writer’s block, that he’d distract himself (“to unblock himself”) by going for a walk, drinking a beer, having sex, watching television, cleaning out the garage, whatever. Only the problem was, when the break was over, he’d be in even a worse pickle, and have even less time. …sounds an awful lot like addition, doesn’t it?

So, he started looking for a smart and creative way to break the cycle, and he now claims he never gets writer’s block. Writers block comes from three things: not having enough ideas, having too any ideas, or having just the right amount. If there’s not enough, he goes “looking for flag stones”. If there’s too much, he organizes them. If things are just right, he polishes and shapes them. Volia, writer’s block is gone.

But what is this “looking for flagstones” he’s talking about? Turns out when you’re building a wall, like a retaining wall out of stone, the quick “city” way is to purchase a ton of rocks. However, in the country, you go out into fields, looking for stones that are the right size, shape, and color. You collect them, and after a number of years, you have your wall.

Problem is, if you just flat out collect for the wall, you run into two problems. One is that as time presses on, it gets harder and harder to find wall-specific stones. You can’t just say “I’m going to find five today.” That doesn’t work. Second, sometimes you come across other stones that have practical value or some emotional connection, but you have no immediate use for them. He says to collect those and start different piles. And with this advice, he points out with modern day cheap storage, it’s possible to collect a lot of ideas and then organize them later. Also, he spends considerable time telling how to capture ideas that might get lost such as when you’re dreaming or in a social context where it doesn’t seem appropriate at first.

Weinberg points out that a “good stone” is an idea that moves you strongly emotionally. When a passage stands out, when a well worded sentence is found, when a thought sticks out, when someone says something, when you get a flash of insight or perspective on the world, and so forth, these are good stones. Weinberg has made a career out of collecting ideas, and with it, he’s never out of material or inspiration for writing. He encourages the reader to do the same, through a series of simple observational exercises he applies in his writing classes, and I have to say… it works. My own set of blogs have been stepping up in the number of entries; I’m seeing far more reader email and comments than ever before.

Weinberg pointed out that upon a friend of his giving a review to another author’s book, praise was given that it was a gold mine. And when Wienberg asked his close friend why he never got that kind of praise. Weinberg’s friend thought and said a gold mind is something where you have to move a lot of earth, and if you’re lucky, you get a nugget. Then he proceeded to say that Weinberg’s books were more like coal mines. Continuing, that every shovel full is valuable.

And, I’d have to agree.

Weinberg draws on tons of deep and clever concepts, thoughts, and expressions, weaving them into folds of comedy and information, conveying his points effortlessly and concisely. He illustrates how the “Fieldstone Method” works for fiction, non-fiction, and technical material. And, it really does.

This simple blog entry represents my personal synopsis of the first five chapters in a twenty chapter book. I strongly encourage you to get your hands on it and read it. It will take you no time what-so-ever, as it’s less than 200 pages and quite thin. In no way does it discuss grammar, technicalities of the English language, or pseudo-science positive thinking crap.

Wienberg in the course of 40 years has produced 40 well known books and over ten times that in articles. His students are cranking out books and articles. His methodology is quite an eye opener, especially if you want to become more prolific.

The Best Photography Books Ever on Light

Without exception, two books leap to the front of my personal library when it comes to Photography.

Light: Science and Magic
Light: Science & Magic
Crime Scene Photography

Most photography books explain general principles of photography, how the camera works, and, if lucky, perhaps a simplified discussion of optics and proper metering. By the time you really understand the relationship between ISO, Shutter Speed, and Aperture, and are capable of shooting in Manual mode, you’re not done — you’ve just scratched the surface. The next subject you need to tackle is light, and it is light that allows you to get those really dramatic and interesting shots. And if you think because you own a 50mm f/1.4 lens, you know it all; think again.

Light: Science & Magic is a masterful excursion into the role that light plays with photography. It covers light sources, reflection, and angles, explaining why surfaces look the way they do. Certain objects are hard to photograph, such as glass or white subjects on white backgrounds. Either detail is lost or everything comes out gray. This resource shows how to use light to solve those hard problems. The section on diffused, direct, and glare reflections is worth the price of admission alone. Camera placement, light placement, and gobos, combined with the right metering technique, will yield stunning images. It covers methodologies of lighting portraits in fascinating ways. The book is littered with tips and tricks from front to back. It’s odd to find a book where there’s solid, approachable, directly applicable material on every page, but this book does it.

The next book is quite unexpected, Crime Scene Photography. This book goes far deeper into explaining the workings of photography, delving into the mysteries of optics, proper exposure in bad lighting conditions, and the clever use of filters. It clearly explains inverse square laws, plays with subtle differences between intensity and distance, unravels why rules of thumb actually work, shows how to get the most from a flash. And all these topics roll up to support how to draw out the details you want to capture, including from fluorescent and infrared sources. There’s tons of information to convey size and play with perspective, deal with underwater situations, and how to digitally correct severe problems when you can’t retake the photo. The book is chalked full of examples.

Frankly, if I could only own two books on photography, it would be these. I read the again, and again, and again.

Walt gives these books, two thumbs up!